Implementing a page view counter
Published: 22 May 2022
Updated: 12 Feb 2023
Recently, I tried to understand the page visits for my website, and I found my analytics report confusing (especially the reporting related to the number of page visits). So, as a developer, I took things into my hands and decided to build a page view counter for my website. So, let’s discuss the implementation in detail.
My website’s tech stack
This website is hosted on Cloudflare and developed using Astro (with Svelte as an integration choice for writing components). The following article will discuss the implementation in the context of these technologies. However, I have kept the explanations generic so that you can apply them to other technologies.

What is a page view?
To keep things simple, we can define a page view as anytime a user loads a page in their browser, which means refreshing/reloading gets considered as a new page visit.
While implementing this feature, I noticed that some popular websites (like redfin.com, carvana.com, etc.) also use a similar definition for a page view for their listings.
A more complex definition of a page view could consider a page reload operation within an interval of time as invalid. However, adding this complexity means adding more JavaScript code to the client, and the potential value for the user is still the same.
Defining the user experience
We have to be aware that adding this feature does not add a lot of value for the user as they are more concerned about the quality of content on the website. So, let’s define the experience as follows:
- A user’s experience should not get spoiled because of this feature. For example, any error should get handled gracefully, any operations to run this feature should not become blocking, etc.
- It is ok to render inconsistent data for a user. For example, one user can see “10” page views while the other is seeing “8” page views. I will expand more on this topic in the next section.
Defining the implementation details
At this point, we have a good understanding of the experience that needs to get built, so let’s define the pieces that we need to create a feature like this:
- A data store for storing the page views. It is ok to pick a solution that provides eventual consistency.
What does it mean by eventually consistent?
In the database realm, this refers to the concept when nodes operating in a distributed database are not in sync, which means users reading the same data from different nodes can get different values. KV store from Cloudflare is one such solution. This covers the point made in Defining the user experience section about seeing different page view numbers.
- A UI component that fetches and updates the data after it gets rendered.
- API endpoints to perform
ReadandUpdateoperations on the data.
Creating a remote data store on the cloud provider
This section covers the steps to create a remote data store (table/namespace, etc.) on a cloud provider. The idea is to create a data store for each enviornment (dev, pr build, production, etc.) to have data separation.
The following section will explain steps for creating a Workers KV namespace on Cloudflare. If you are not interested in using Cloudflare, jump to the component implementation section.
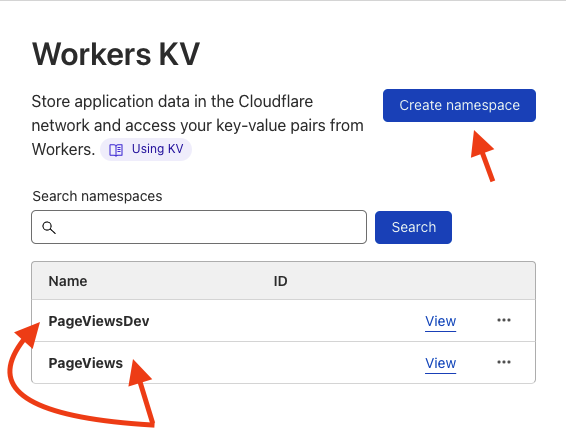
Creating KV namespaces
For this feature, I created a namespace for my Preview (Github PR builds) and Production environment and configured it as shown in the image below:
Quick Note: I am also using the Pages offering from Cloudflare to host this website. Pages provide the ability to host dynamic applications running on edge servers.
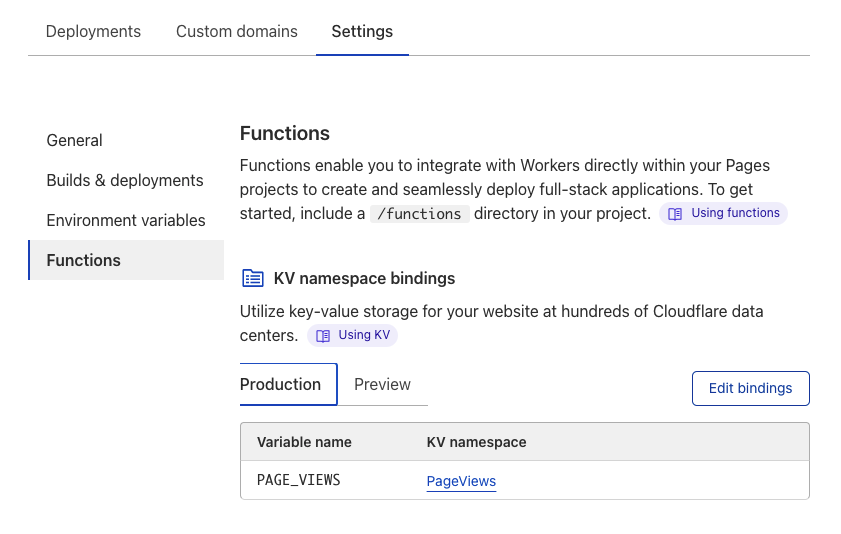
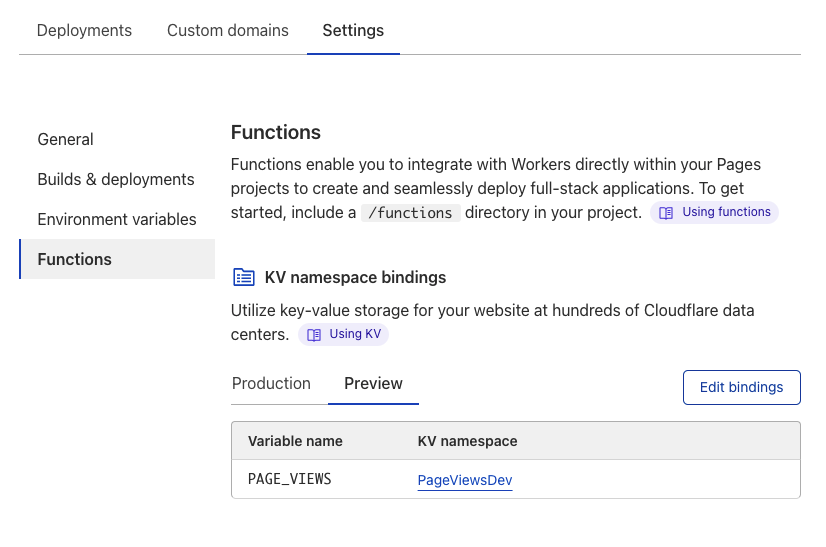
After a namespace gets created, it can be added as a binding to the ”Functions“(in beta at the time of this writing) in a ”Pages” project. A binding provides access to the namespace in your Functions code for performing data store operations like get, put, etc. I will discuss this in detail in the API implementation section.
Go to your “Pages” project settings and add the newly created bindings.
Implementing a UI component
For this feature, we need to perform the following things in our component:
- Make a network call to fetch the page views for the current page.
- Make a network call to update the page views for the current page.
- Render the appropriate experience once the data is available.
- Handle any errors gracefully, and always render a default experience. For example, in the worst case, we can render the page count as 1.
I use Svelte for writing components for my website. However, the approach described here can be translated to other frameworks (for example, using the useEffect hook in React) or vanilla JS (running the request functions after the onload event).
Also, keep in mind that we will discuss the implementation of the GET and PUT endpoints used in the fetch calls in the API implementation section.
<script lang="ts">
  import { onMount } from 'svelte';

  let pageViews = 0;

  // execute this function after the component mounts
  onMount(async () => {
    const encodedPath = encodeURIComponent(window.location.pathname);

    try {
      // fetch the data for the current page
      const response = await fetch(`/api/pageViews?path=${encodedPath}`, {
        method: 'GET',
        headers: {
          'Content-Type': 'application/json',
        },
      });

      // Gracefully handle the error scenario.
      // Default to "1" as the current user is seeing the page
      if (!response.ok) {
        pageViews = 1;
      } else {
        const { count } = await response.json();
        // Optimistically, show the new page view count
        pageViews = Number(count) + 1;
      }
    } catch (err) {
      // Default to "1" as the current user is seeing the page
      pageViews = 1;
    }

    // Make a network request to bump the page view count for this page
    // It is OK to perform a fire and forget (not waiting for the promise to resolve) call for updating the data source.
    fetch('/api/pageViews', {
      method: 'PUT',
      referrerPolicy: 'same-origin',
      body: JSON.stringify({
        path: encodedPath,
      }),
      headers: {
        'Content-Type': 'application/json',
      },
    });
  });
</script>

// File: PageViewCounter.svelte

{#if pageViews > 0}
  <p
    class="dark:bg-stone-900 bg-slate-200 dark:text-stone-400 text-slate-400 mx-auto p-2 my-12 text-xs max-w-fit"
  >
    Seen 👀 by {pageViews} human(s)
  </p>
{/if}
Finally, add this component to the Layout component for your website such that all expected pages can get this feature by default. We can also make this component client only (i.e., avoid rendering it on the server) as we only want to record client visits in a browser.
// Inside your shared Layout component ...
<PageViewCounter client:only />
...
Implementing API endpoints
At this point, we have most of the pieces in place, and we just need to implement the endpoints used in our component.
GET page views endpoint
In our component, we used the following as the URL for fetching page views for a page.
GET /api/pageViews?path=<encodedPathName>
Our route handler should perform the following:
- Fetch the “path” query param from the request URL.
- If “path” is empty, return a “404” response.
- Perform a read operation on the the store. If no record is found, use 0 as default.
- Return a “200” response with the expected page view count in JSON format.
PUT page views endpoint
In our component, we used the following as the URL for fetching page views for a page.
PUT /api/pageViews
Our route handler should perform the following:
- Read the request body to get the page “path”.
- Read the data store to see if there is already a value or defualt to 0.
- Update the value by 1 in store.
- Return a “204” response.
The upcoming sections will discuss the implementation in the context of Astro and Cloudflare Functions. If you are not using these technologies, jump to the conclusion section. However, I hope the generic description above will help you implement the routes in your framework.
Astro and Cloudflare Functions
Since I am using Astro to build this website, which does not have support for developing API (similar to Next.js) as it is a static site generator, this is where, Cloudflare Functions(beta) for Pages comes into play.
Essentially, Functions allow running server-side code without running a dedicated server (similar to AWS Lambda in a logical sense). The nice part about functions is that they can run locally and provide a complete development experience, i.e., even access to a KV namespace (local file system-based).
Updates to project setup
Install the beta version of Cloudflare’s Worker CLI using the following command.
npm i -g @cloudflare/wrangler@betaTo add Functions to a project, create a functions folder at the root of your project.
mkdir functions && cd functions && mkdir apiUpdate/Add the dev command in package.json.
...
"start": "TAILWIND_MODE=watch astro dev",
"dev": "wrangler pages dev --proxy 3000 --kv PAGE_VIEWS -- npm run start",
...
Implementing Cloudflare Functions
Create a file inside the functions/api folder as pageViews.ts and added the request handlers for incoming requests:
// inside: functions/api/pageViews.ts

// PUT /api/pageViews
export const onRequestPut: PagesFunction<{ PAGE_VIEWS: KVNamespace }> = async (
  context
) => {
  const {
    request,
    env: { PAGE_VIEWS },
  } = context;

  // CF way to access the body of the put request
  const { path } = await request.json();

  let currentCount = Number(await PAGE_VIEWS.get(path));
  if (!currentCount || isNaN(currentCount)) {
    currentCount = 0;
  }

  // KV store does not allows "Number" as value
  await PAGE_VIEWS.put(path, String(currentCount + 1));

  return new Response(null, {
    status: 204,
    statusText: 'ok',
  });
};

// GET /api/pageViews
export const onRequestGet: PagesFunction<{ PAGE_VIEWS: KVNamespace }> = async (
  context
) => {
  const {
    request,
    env: { PAGE_VIEWS },
  } = context;

  const path = new URL(request.url).searchParams.get('path');

  if (!path) {
    return new Response(null, {
      status: 404,
    });
  }

  const encodedPath = encodeURIComponent(path);
  const count = (await PAGE_VIEWS.get(encodedPath)) ?? 0;

  return new Response(JSON.stringify({ count }), {
    status: 200,
  });
};
Conclusion
Well done, you have made it to the end! I hope this article gave you good insights into implementing a feature like this. We have covered some interesting points such as choosing the right data store, developing the right user experience, handling errors, etc.
If you end up adding a page view counter after reading this article, tag me on Twitter, and I will be happy to take a look.
Keep on coding!